Does anyone know how to pull these apart - mine has just snapped this morning. Im open to suggestions on NON Genuine replacement belts if there are any available?
1 Like
Same just happened to me - you got a link for that Adrian please?
I had this same issue recently, I contacted Wahoo 7 days ago to report the fault, I knew it was 6 months out of warranty, but after I sent them some pictures and proof of purchase via bank statement (could not find original receipt). they agreed to replace the unit, and I received my brand new CLIMB today. I only average about 30 miles per week indoors, as much prefer to be out on the road, so that may explain why mine lasted 2 1/2 years.IMG_2386|375x500
even having seen so many complaints I bought the climb. six months he’s getting weak, sometimes he can’t stand to climb and locks in a position. then back to normal.
Start by removing the bolt near the recess for the remote control in the top of the unit. You can then remove the plastic cover, exposing a metal plate with 9 further bolts (2 of which hold the top pulley). You’ll also see a captive nut, with access to the corresponding bolt visible underneath (turn the unit upside down).
Once the metal plate is removed, you can remove the 8 plastic covers (4 on each side) that cover the gap in the unit (above the axel holder) as it moves up and down. Remove the 4 plastic runners which hold the plastic covers in place. Remove the 4 longer plastic covers that sit below the axel holder (2 each side) followed by the 2 covers that sits around the axel holder (1 each side).
To gain access to the lower part of the unit, you’ll need something plastic to prise apart the two halves of the black plastic base. I used the spoon on a plastic spork, but car trim tools should work and possibly a tyre lever. There are a number of clips that hold it together, but don’t apply too much force to avoid snapping it. I started at the end opposite the power lead, but not sure it matters (you’ll see a vertical line where the two halves join). Once you’ve separated and removed the two plastic halves, you can remove the bolts (4 have nuts - don’t lose these, the remaining 6 bolts do not) which hold the base on. Remove these and you have access to the lower pulley and should be able to replace the belt.
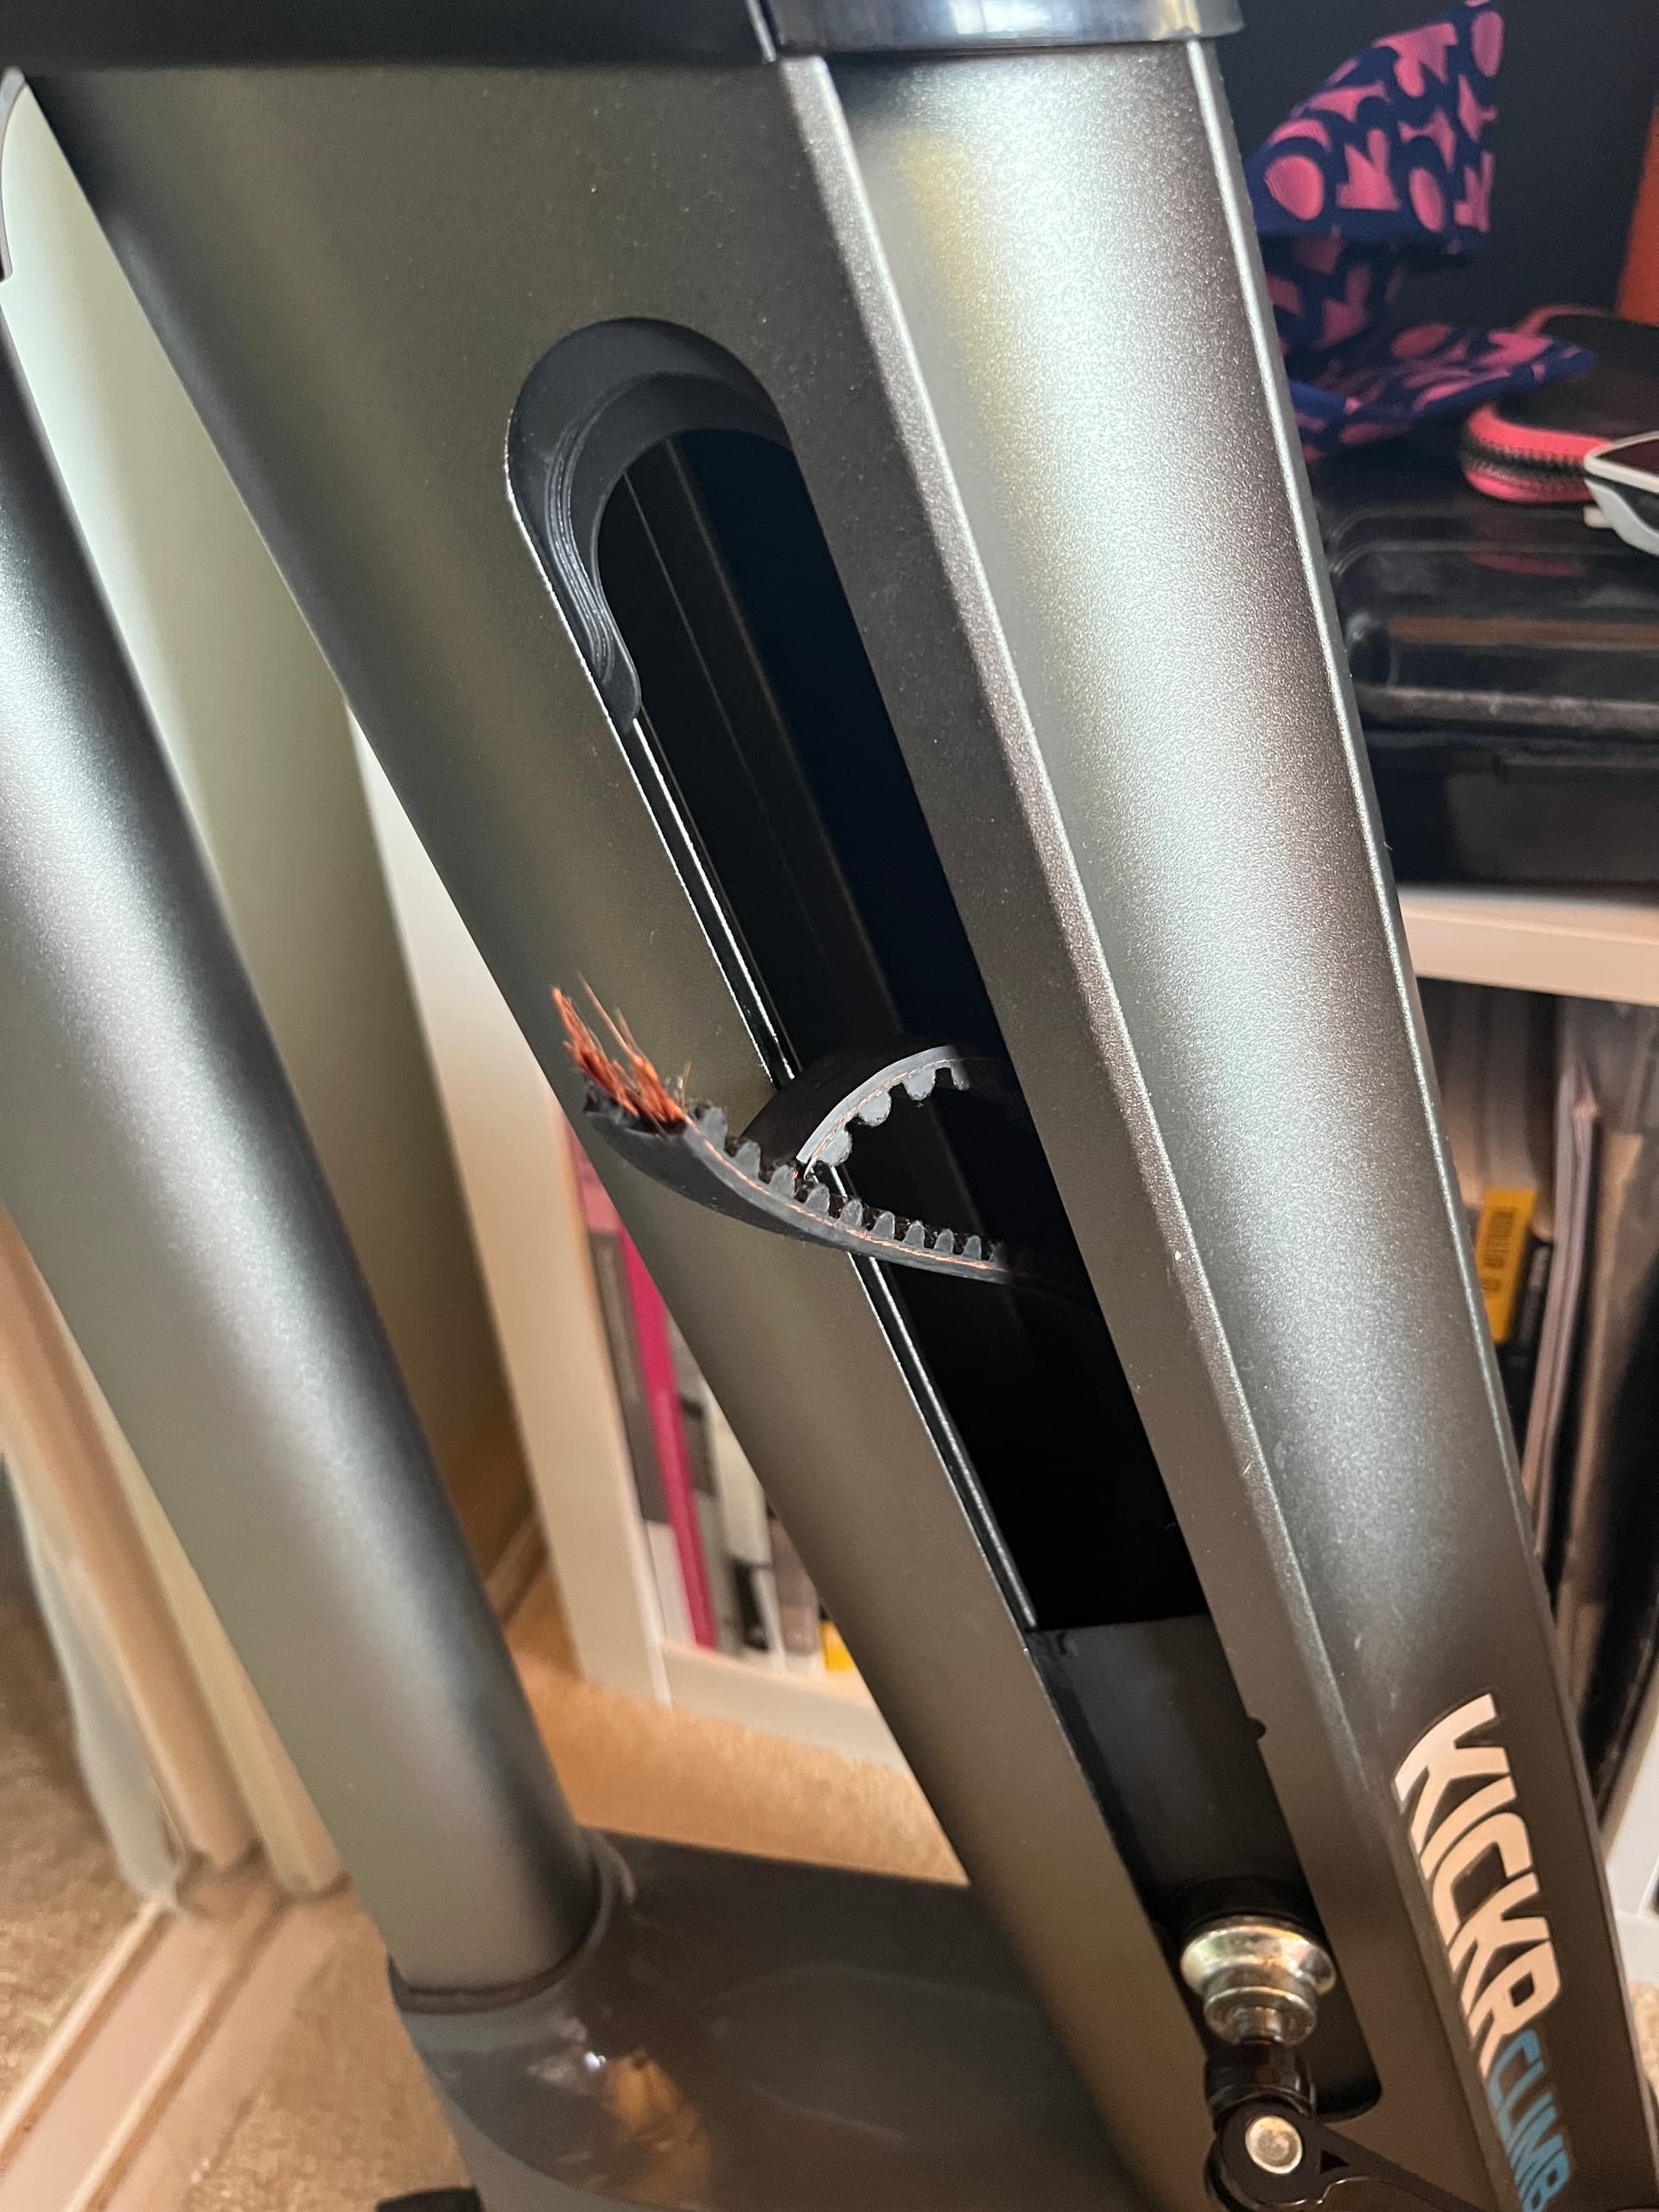
The belt itself is crimped onto two small plates on the axel holder, despite a notice on the belt that I had re not crimping! Have no idea if it was the stock belt or a replacement one, but it’s a VEGA 1152-8M 3917 033F.
Note that I haven’t yet sourced a replacement belt (with a steel core, rather than glass fibre) or put the unit back together again, so follow these instructions at your own risk!
Will add further posts once I’ve made more progress. Or broken it entirely!
3 Likes
Great write-up, I hope I never have to use it ![]() !
!
For what it’s worth, I got my Climb in October last year. I think I weighed 75 kg at the time (down to 70-71 now), 10-15 hours a week on Zwift, TD 100%, lots of climbing, occasional racing. I’m wondering if the design or materials were improved on newer units - I haven’t had any issues with it so far.
Bumping this thread because the belt on my Climb broke yesterday. Had it half pulled apart before I found this thread.
I bought it two years ago almost to the day, so probably no warranty. I assume anyone that had their unit replaced was under the 1-year warranty period.
I have a ticket in with Wahoo. We’ll see what they say. I’ll push them for a source for the belt if needed. Seems unlikely the belts are custom made.
Good luck. I think Wahoo know that these fail at the belt far too often and so hopefully will see you right, even if it is out of warranty. Mine snapped after less than a year of careful use. It happened on a steep uphill in New York and dropped my front end quite violently from the highest extension. I thought I was going to come off the bike. When I took it apart I was surprised that all the weight was supported just by a single belt, with no apparent safety mechanism.
Ordered a new belt from eBay after getting fed up of seeing my Kickr Climb still in bits in the lounge, but cannot see how to get the new belt through the top pulley. Have removed the 2 c-clips and tried removing the centre pin/pulley axle but no joy. It moved a bit but not all the way out (despite using a club hammer and a drive). So only option I have at the mo is to cut the belt and place the cut in between the two clamping plates that hold the belt onto the axel support block.
I noticed the clips but didn’t try them because I didn’t have a new belt. Interesting that didn’t get you anywhere. Somewhat makes sense, I guess, because the clips are quite small. Good to know the ebay belt fits, at least.
After sending some photos, Wahoo is sending me a new unit, which they didn’t have to do given I’ve had it two years. So, huge thumbs up for Wahoo customer service! Seems in most cases they would request the failed unit be returned to them, but I live in AK so they had me prove I cut the power cord and asked that I take the unit to an electronics recycler.
1 Like
I’ve logged a ticket with Wahoo re how to remove the top pulley axel before cutting the belt. I can’t see cutting the belt doing any damage, given that it’s held onto the axel block via 2 small metal plates and 8 bolts, but it would be nice not to have to cut it.
Wow, that’s a good result getting a replacement after 2 years.
Would love to know if Wahoo actually made any mods to improve the lifespan of the belts. They really should have used a chain (which I think the Elite Rizer uses) or a belt with metal strands in the core.
Just for clarity, Elite chose a totally different mechanism, based on a revolving vertical bolt and a threaded carrier. This eliminates the snap-and-drop risk inherent in the KICKR CLIMB’s design:

Ironically the Climb also uses a short, horizontal screw mechanism to transfer the power from the motor the belt. Gah.
Disassembly Tips
- Photograph every stage of removing something, possibly from multiple angles.
- The 4 plastic runners only fit in the tower in one way, so either mark them appropriately or keep swapping them around until they fit properly when reassembling.
- When removing the belt from the axel block, do not fully remove the 8 bolts that hold the 2 mounting plates holding the belt to the block. Loosen sufficiently to allow belt to be wiggled out. Saves hassle later!
- When disassembling the base of the unit, there are 4 nuts & bolts near the power outlet. Do not remove the two closest to the power cable. Just loosen these and you can pivot the base out of the way with these still in.
Assembly (using a broken/non-endless belt)
- Attach one end of the belt to the axel block via 1 of the 2 small mounting plates. If you've managed to keep all 8 bolts in, it might take a bit of wiggling but can be done.
- Thread the belt through the top pulley.
- Attach the other end of the belt to the axel block, with the break in the belt between the 2 mounting plates (with the ends of the belt as close together as possible).
- Observe the various tabs in the slots on the 4 runners which will prevent anything from moving past it. This is important when adding the 4 lower blanking plates later.
- Insert the 4 plastic runners into the top of the tower, with the tab on each runner resting on the top of the tower. Each runner only fits one slot correctly, so if it doesn't look right or is not sitting square, try another position.
- Slide the 8 smaller top blanking plates into the runner slots at the top of the tower (4 each side). Fix the top plate with a couple of bolts to prevent the runners and top blanking plates from moving.
- Fiddly bit: place the 2 largest lower blanking plates either side of the axel block, orientate the axel block to have the belt mounting plates on the opposite side of the tower to the 'Kickr Climb' logo and insert into bottom of the tower (top pulley first, then the axel block). The blanking plates must not occupy any of the slots in the runners. If they are not flush against the axel block, they'll be prevented from moving freely by the tabs in the runner slots.
- From the bottom of the tower, insert the 2 lower blanking plates in each side. They occupy the 2 outermost slots of the runners (furthest away from the axel block). Test that the axel block still moves freely up and down the tower after inserting the plates.
- Keep the Climb horizontal from now on to prevent the lower blanking plates from falling out.
- Remove the 4 bolts on the motor cover and remove it, to be presented with the motor mechanism covered in gooey black grease.
- Place belt around the lower pulley.
- Replace motor cover but only use a couple of the bolts, as you need to ensure that the mid position of the axel block in the tower is correct, before tightening everything up.
- Insert the motor unit into the bottom of the tower, raising/moving the axel block to help get the belt out of the way and ensure that everything is still moving freely.
- Insert 1 or 2 of the 3 main bolts into the base of the unit.
- Pull the top pulley up and fix to the top plate with both of the 2 bolts. Note that you can control the tension in the belt via how much you tighten these bolts. This may have an impact on belt longevity. The belt should probably still have some play if you push against it.
- Plug in the Climb and click the central button on the remote twice to position the axel block at the mid point.
- Unplug/power down the Climb.
- Note how close the axel support block is aligned to the mid point on the tower and move the belt around the lower pulley accordingly, having first removed the top pully from the top plate and the motor cover. It's a pain but you do get quicker at this! Also remember that the belt is secured on the side opposite the 'Kickr Climb' logo when adjusting it's position in relation to the mid point.
- Once you've got the axel block aligned with the mid point, try raising and lowering via the remote to ensure it has full movement.
- Reassemble the unit, although you can hold back on re-fitting the 2 lower plastic surrounds (saves risk of breaking them if you have to remove them again) and the bolt that fits into the top plate from underneath the top of the unit (it's just a pain to tighten/remove due to the lack of space).
- Smile and relax with a cup of tea and several biscuits.
Given the fact that I couldn’t remove the axel from the top pulley (preventing using a new belt without cutting it) I’ve just re-used the original, broken belt again until I can get hold of a replacement that has a steel core. Most common examples I’ve been able to find are 15mm PU ones. The original belt is 14mm rubber, but the pulleys look like they’ll take 15mm.
6 Likes
Brilliant, thanks Dave!
I’m just reporting that I’ve had my Climb for 6 weeks, and the belt slipped and no longer goes all the way up. No manufacturing date on the device, but given it’s purchased July 2022, and this slippage issue has been reported since 2019, if the device is not revised since 2019 then I’d say do not buy the Wahoo Climb. Sure I’m getting it replaced, but I’m without a working one for 3 weeks and what will happen after 1 year of purchase.
Buy the Elite Rizer instead.
With your detailed notes, I’m saving them offline and a link to this thread, for fear I will have to disassembly in 11 months from now.
-t
1 Like
My Climb has ‘collapsed’ so I’m assuming its the belt problem. Was purchased 3 years ago and the advice from the Australian distributor was that it can’t be fixed as its a ‘sealed unit’ and to buy a new one ($1000) . I won’t be doing that!
Will open up as per the helpful advice from @Dave_Crouch and try and replace belt with 3rd party one on eBay on (DB Spares?)
Any further advice or tips welcome as its a rather expensive door stop!
thanks
You don’t need a new belt, in fact, if you buy a closed loop belt, you’ll have problems fitting it unless you can remove the axle from the top pulley. I had a couple of alternatives that I was going to try which had metal cores rather than plastic cores, but haven’t needed to yet.
I did originally buy a replacement belt from eBay and never installed it, as I’d have to cut it to fit it around the pulley (only realised this once I’d taken the Climb apart). I reused the broken belt which is easy to thread through the top pulley and placed the break in between the 2 belt holding plates. Used it fine for the next couple of months. Currently not Zwifting whilst bike frame is being repaired.
As noted, I think the breaks could be being caused by over-tensioning the belt. This is determined by the 2 screws that hold the top pulley to the top of the Climb. I’m not an engineer though and have been wrong with a lot of things!
Good luck and try taking it apart (with loads of photos). It’s broken already so what’s to lose?!
1 Like

Here’s the top pulley that gave me grief with installing the replacement (closed loop) belt. A broken belt can just be threaded through the pulley/holder.
1 Like
Hey everybody–I don’t own a Climb so I can’t confirm but…are those just timing belts? As in, the things that are under the hood of your car?
I ask because, at risk of sounding like a humble brag, years ago I had two Kickr belts (the ones from the trainer itself) snap on me. I blame user error–someone else was setting up the trainer (not my trainer) for me to ride on. And I am no wattage monster.
But anyway, two belts snapped, and I learned at that point that those Kickrs, at that iteration, just used timing belts, and they could have been replaced from the auto parts store. Looking at the pics being posted here…they sure look like normal timing belts.
(And I ask because timing belts are relatively cheap (or at least can be cheap) and easy to get ahold of.)
1 Like
You need a belt with the 8M tooth pattern and 14mm wide (I think - going from memory here). The belt I have is 1152mm long.
I was going to try something like this:
www.tbepox.cz/ozubena-metraz-8m-15-mm-pu-steel-cord
(which is 15mm) or look for a 14mm version from somewhere else, but I won’t bother until the broken belt that I’m currently using breaks for the second time, as it’s working fine so far.